As a Firestick enthusiast, I’ve explored various methods to capture high-quality recordings of my favorite shows, movies, and apps.
Today, I’m excited to share my firsthand experiences and insights on the best method to record your Fire Stick screen.
Let’s get started on learning how can you record on Firestick with ease.
How To Record Streaming TV on Firestick: Step-by-Step Guide
Equipment You Need:
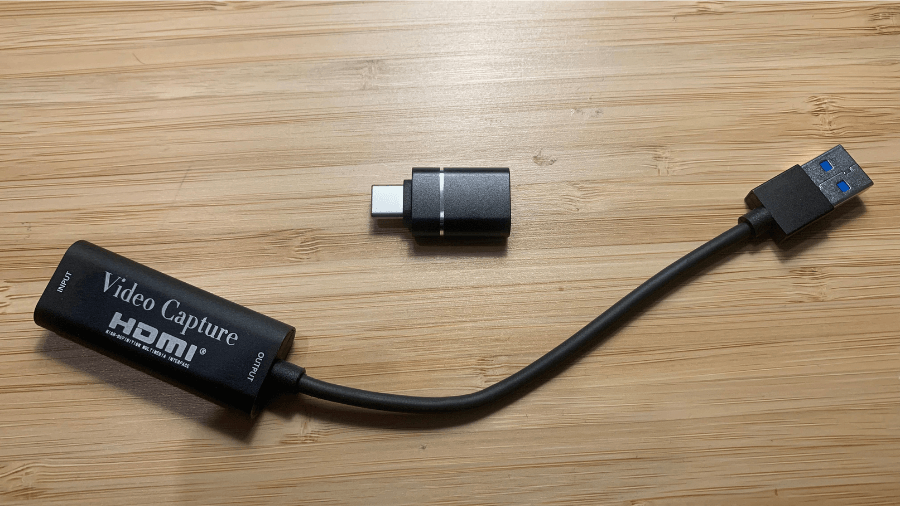
- HDMI Video Capture Device: This device is crucial for capturing high-quality video from your Fire Stick. It’s a budget-friendly alternative to more expensive options like Elgato products. You can find one for about $15-$20 on Amazon.
PS. I’m using the Papeaso Video Capture Card for this guide. It’s versatile for all platforms, including Apple products, and comes with a USB 3.0 to USB C adapter.
Step 1: Setting Up the Equipment
Step 1.1: Fire Stick Connection
- Connect to Power: Start by plugging your Fire Stick into a power source. This is essential to power up the device for recording.
- Link to Capture Device: Use the HDMI extender that comes with your Fire Stick, if available, to connect it to the HDMI input of your capture device. This connection is crucial for transferring the Fire Stick’s video output to the capture device.
Step 1.2: Connecting to Your PC or Mac
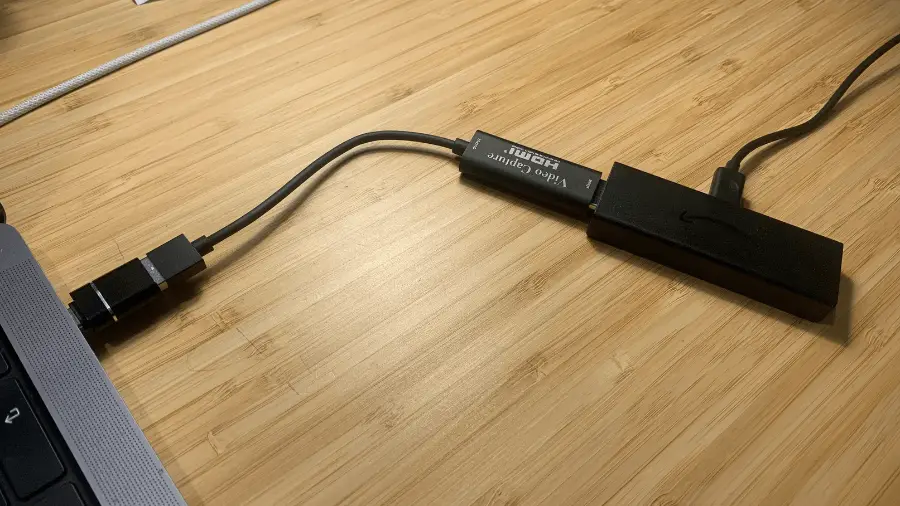
- USB Connection: Find the USB end of the capture device and plug it into an available USB port on your computer. It’s important to ensure that the connection is firm and secure to prevent any potential damage to the USB port.
- For Mac Users: If you’re using a Mac that only has USB-C ports, you’ll need to use a USB-C to USB adapter. Attach the adapter to your Mac first, and then connect the USB end of the capture device to the adapter. This step adapts the capture device’s connection to fit your Mac’s port configuration.
Step 2: OBS Studio Software Setup
In this chapter, we’ll explore how to record your screen using OBS Studio. I’ve chosen this tool for its exceptional features, and because it’s both free and a part of my regular toolkit.
However, it’s worth noting that similar outcomes can be achieved with alternatives like ShareX (also open-source and free), Bandicam, or Xsplit, which are premium products.
Step 2.1: Downloading OBS
- Visit OBSProject.com: Navigate to this site for the official OBS Studio software.
- Choose Your System: Select either Windows or Mac, depending on your computer, and follow the prompts to install.
My Tip: Make sure you download the correct version for your operating system to avoid any compatibility issues.
Step 2.2: Configuring OBS
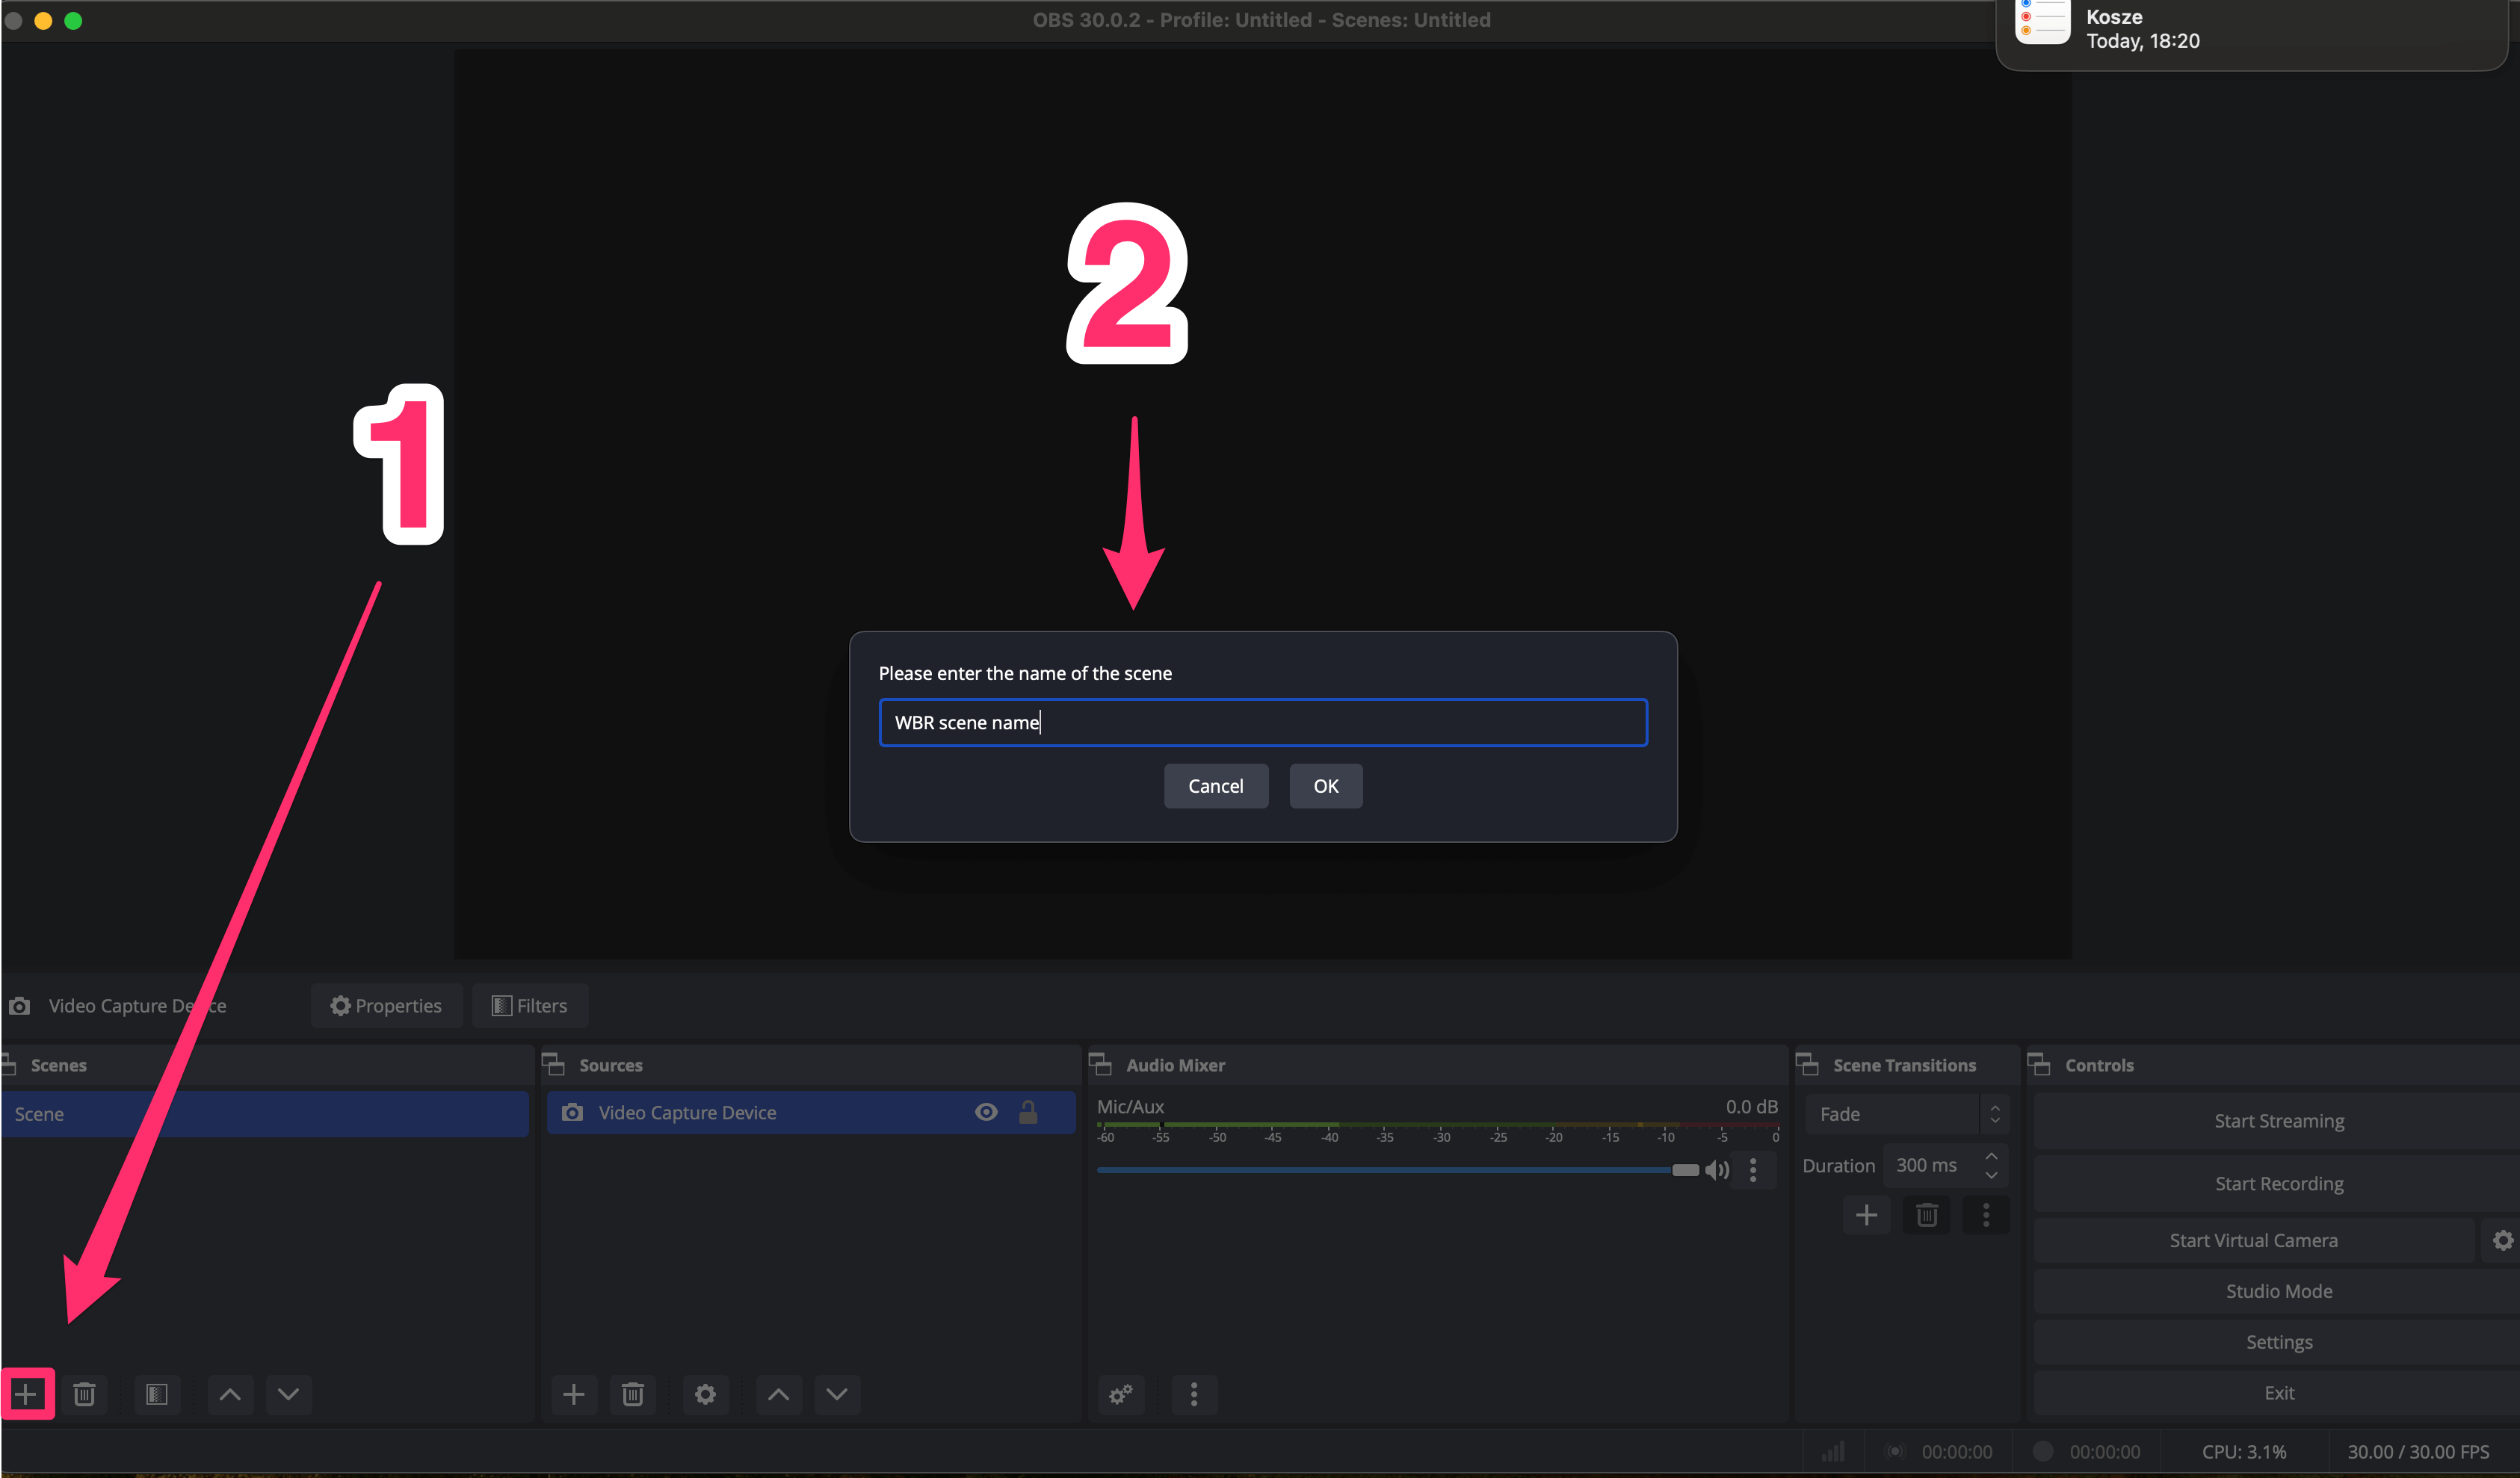
Launch OBS Studio: When you first open OBS, it will look quite bare with empty scenes and source areas.
Create a Scene: Click on the ‘+’ symbol to add a new scene. Think of a scene as a collection of the elements you want to record.
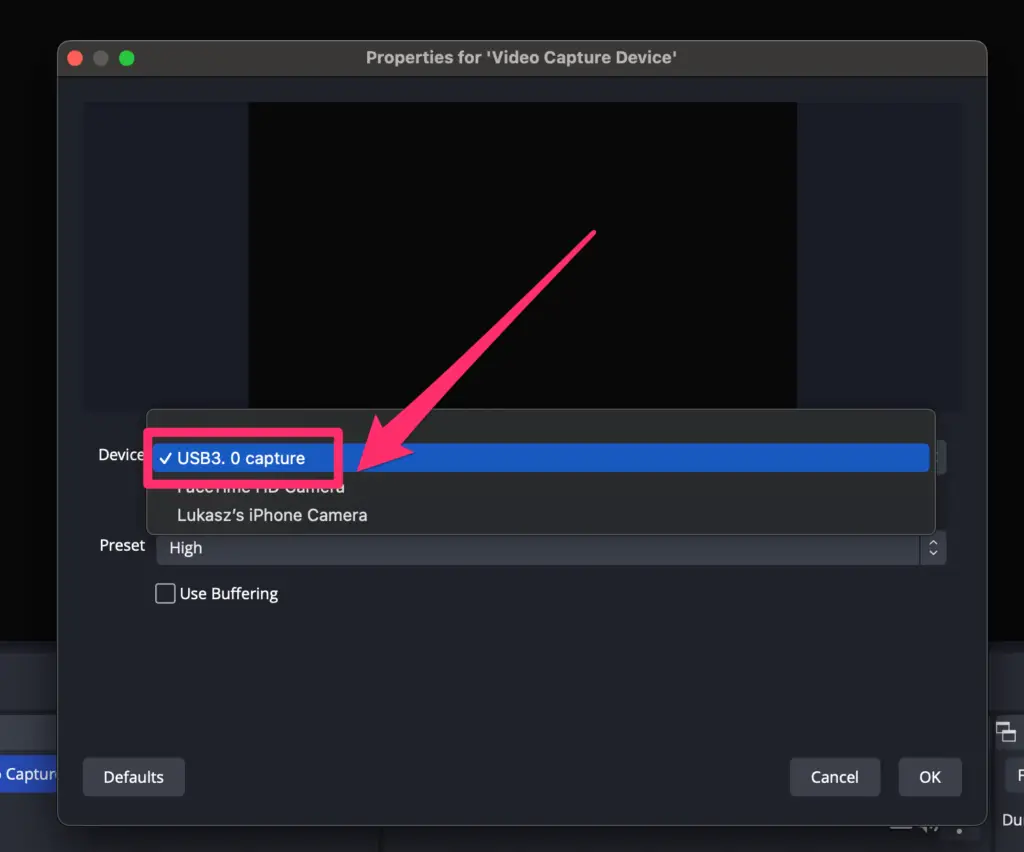
Add a Video Source: Go to ‘Sources’, click ‘+’, and select ‘Video Capture Device’. This is how you’ll capture the Fire Stick’s video.
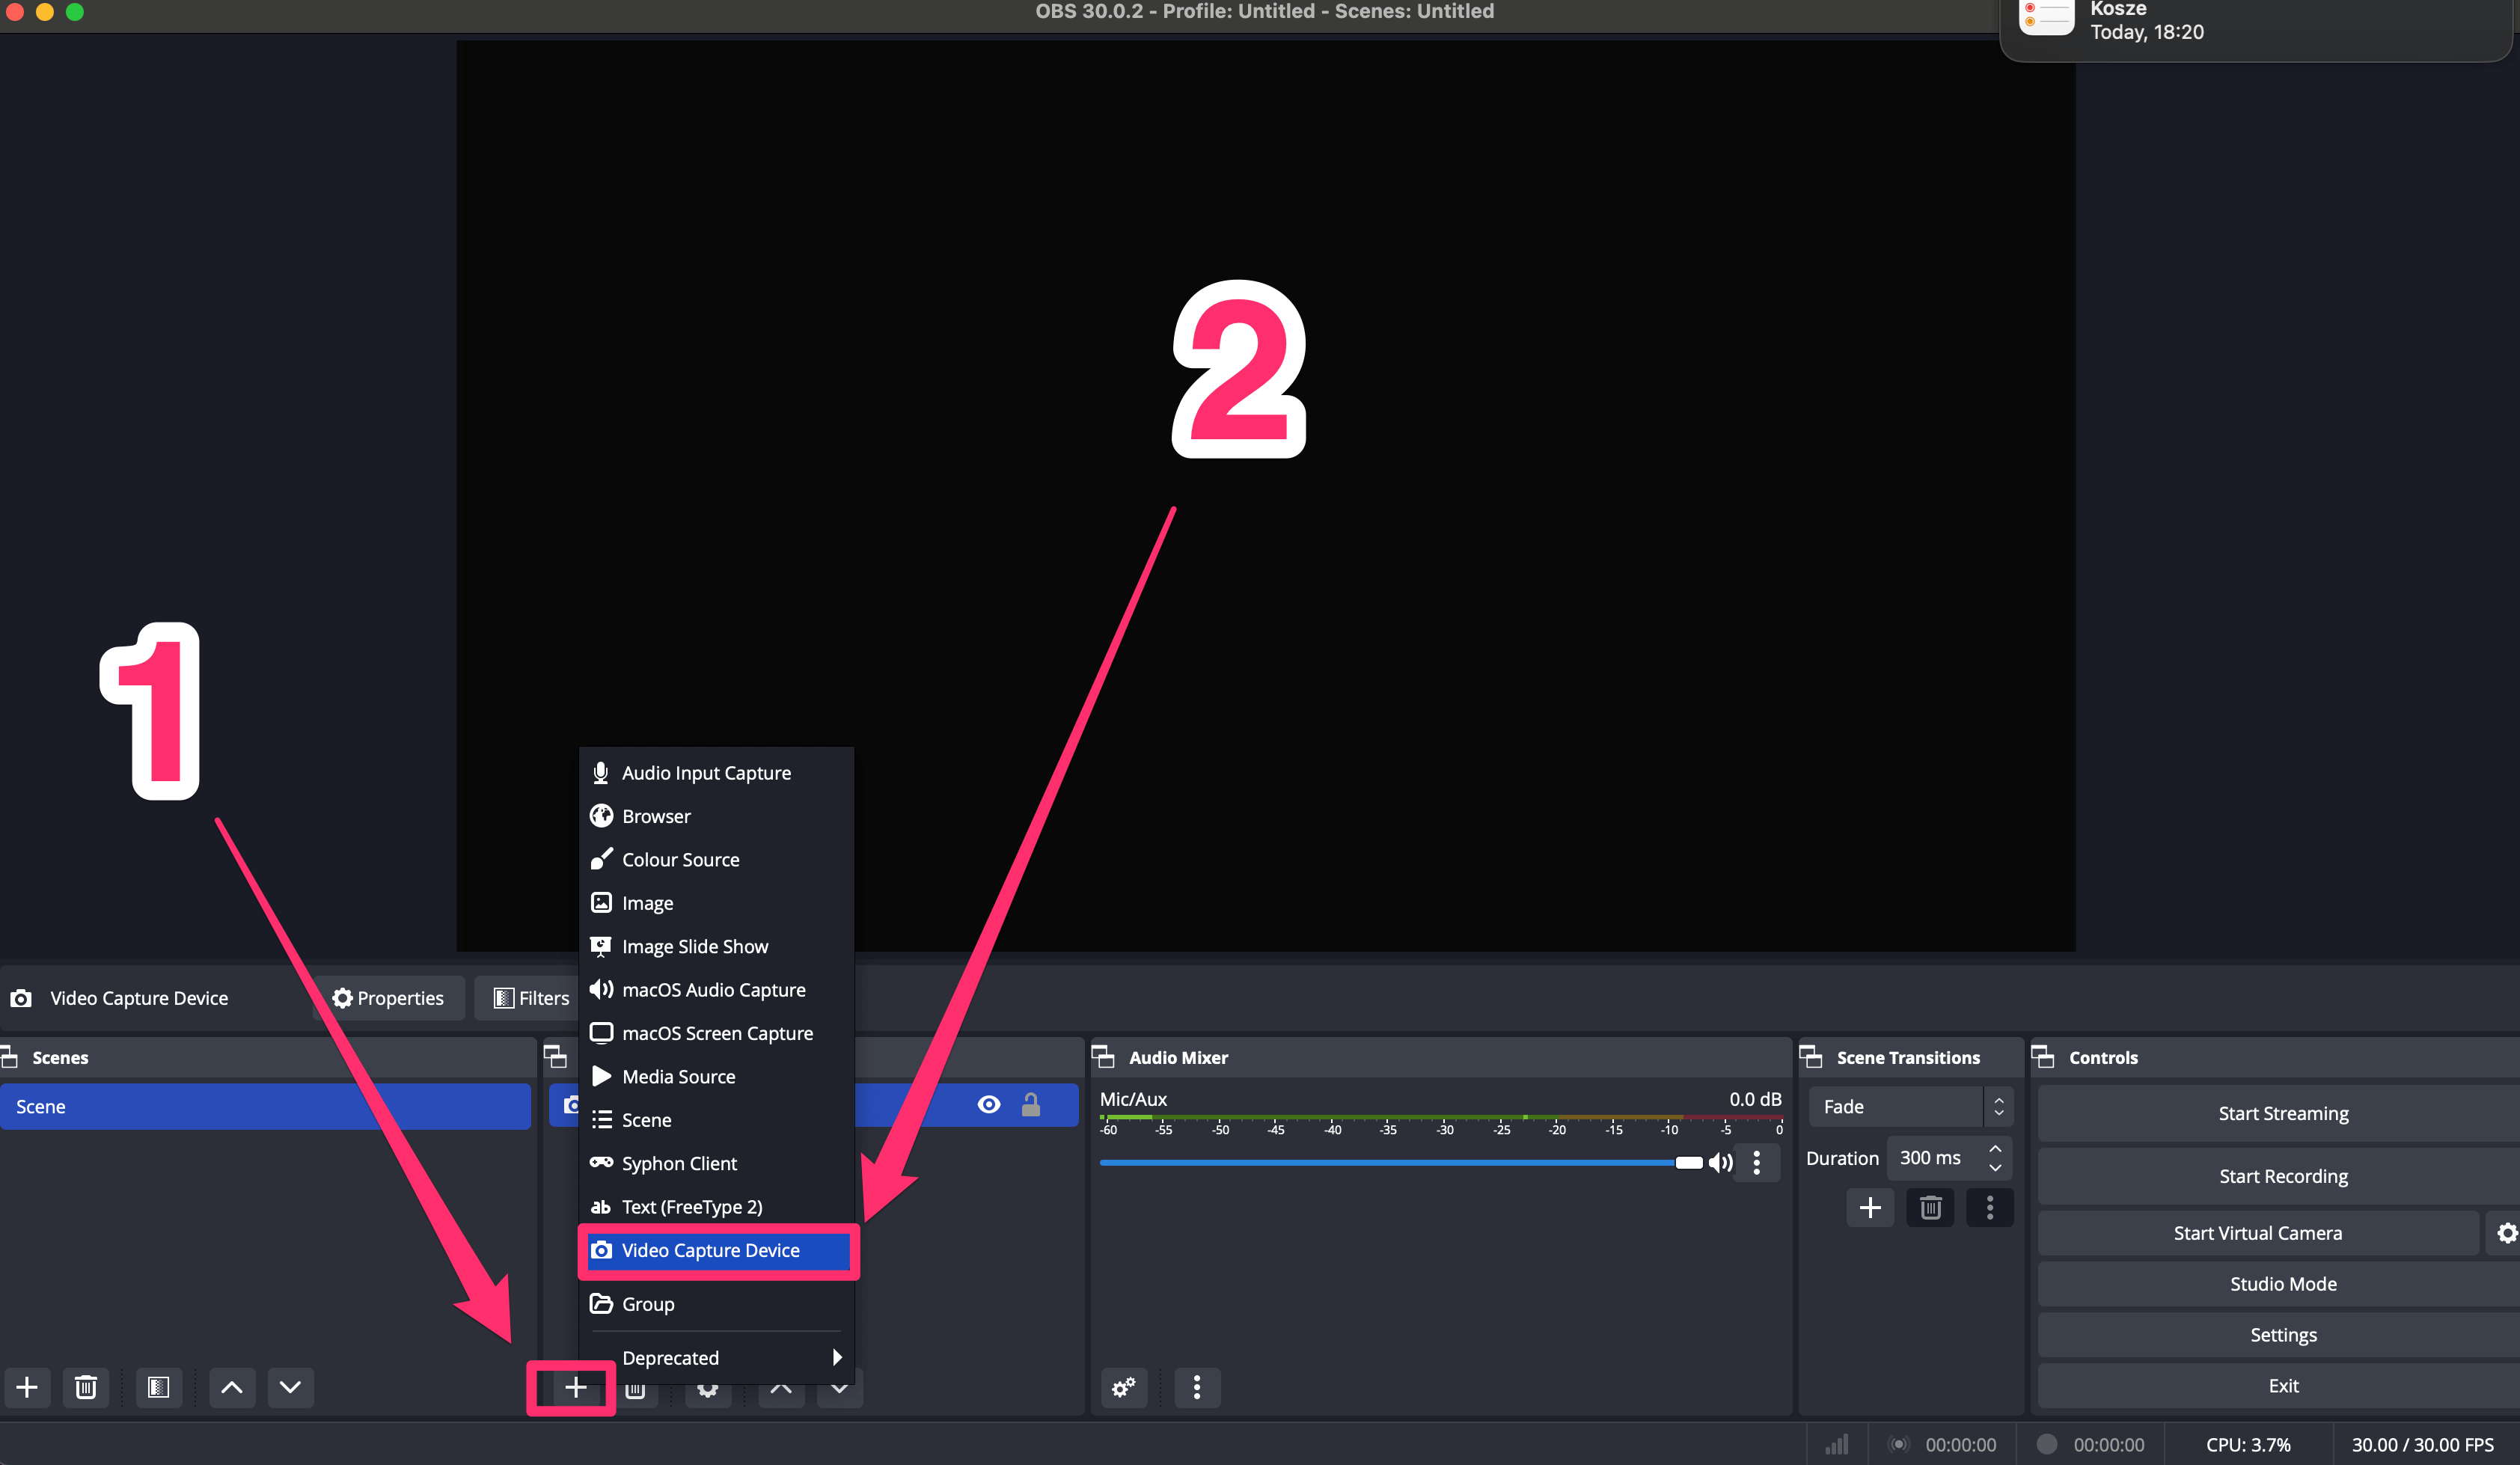
Choose the Right Device: In the settings for the video capture device, select ‘USB Video’ or ‘USB 3.0 Capture’. This ensures OBS recognizes your capture device.
Set Up Audio: Scroll to the audio settings and choose ‘Digital Audio Interface’ for the best sound quality.
Step 2.3: Fine-Tuning Audio Settings
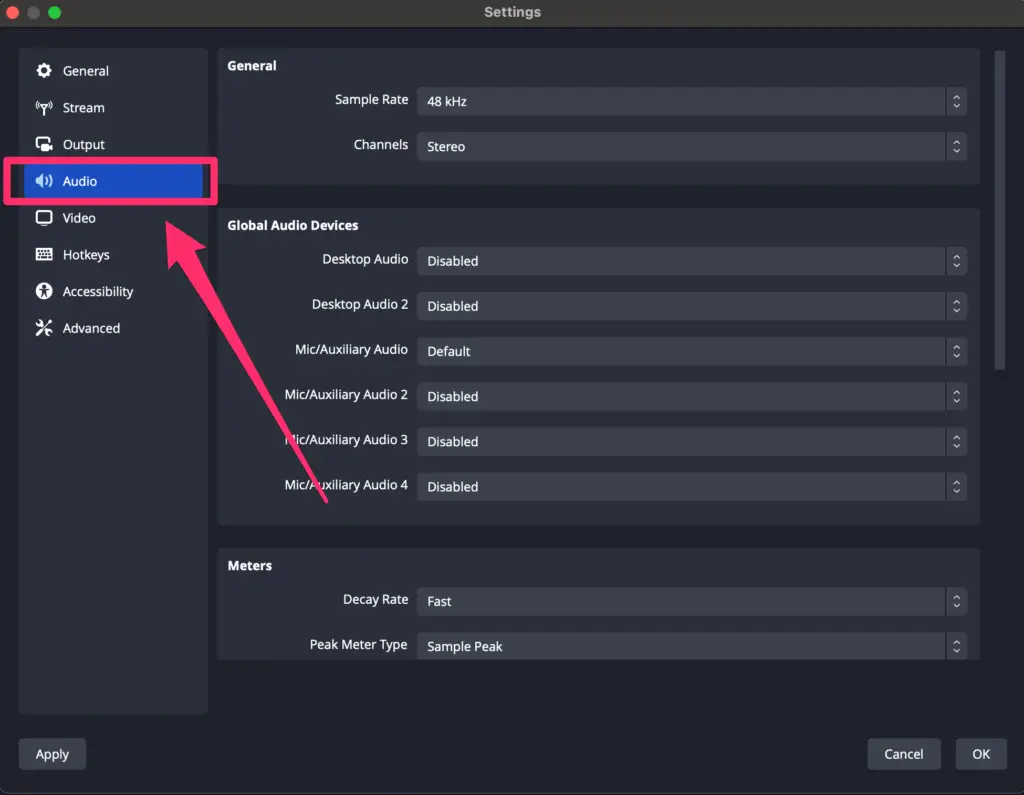
- Adjust Audio Output: Go to ‘Settings’, find ‘Audio’, and under ‘Advanced’, set your preferred output device for sound playback.
- Monitor Your Audio: In the ‘Audio Mixer’ section, right-click on your video capture device. Select ‘Advanced Audio Properties’ and set audio monitoring to ‘Monitor and Output’.
Personal Note: Getting the audio right can be a bit tricky at first, but these settings ensure you capture both video and sound perfectly from your Fire Stick.
With these steps, you’re all set to start recording high-quality video and audio from your Fire Stick using OBS Studio.
If you want to master OBS I can highly recommend this quick start guide or this video tutorial
Expanding Your Recording and Viewing Experience
Once you’ve successfully set up OBS with your Fire Stick, you’re ready to dive into the world of high-quality recording and viewing.
The Fire Stick interface should now be visible within the OBS window, signaling that everything is correctly configured. Here’s how you can make the most of this setup:
Recording Your Favorite Content
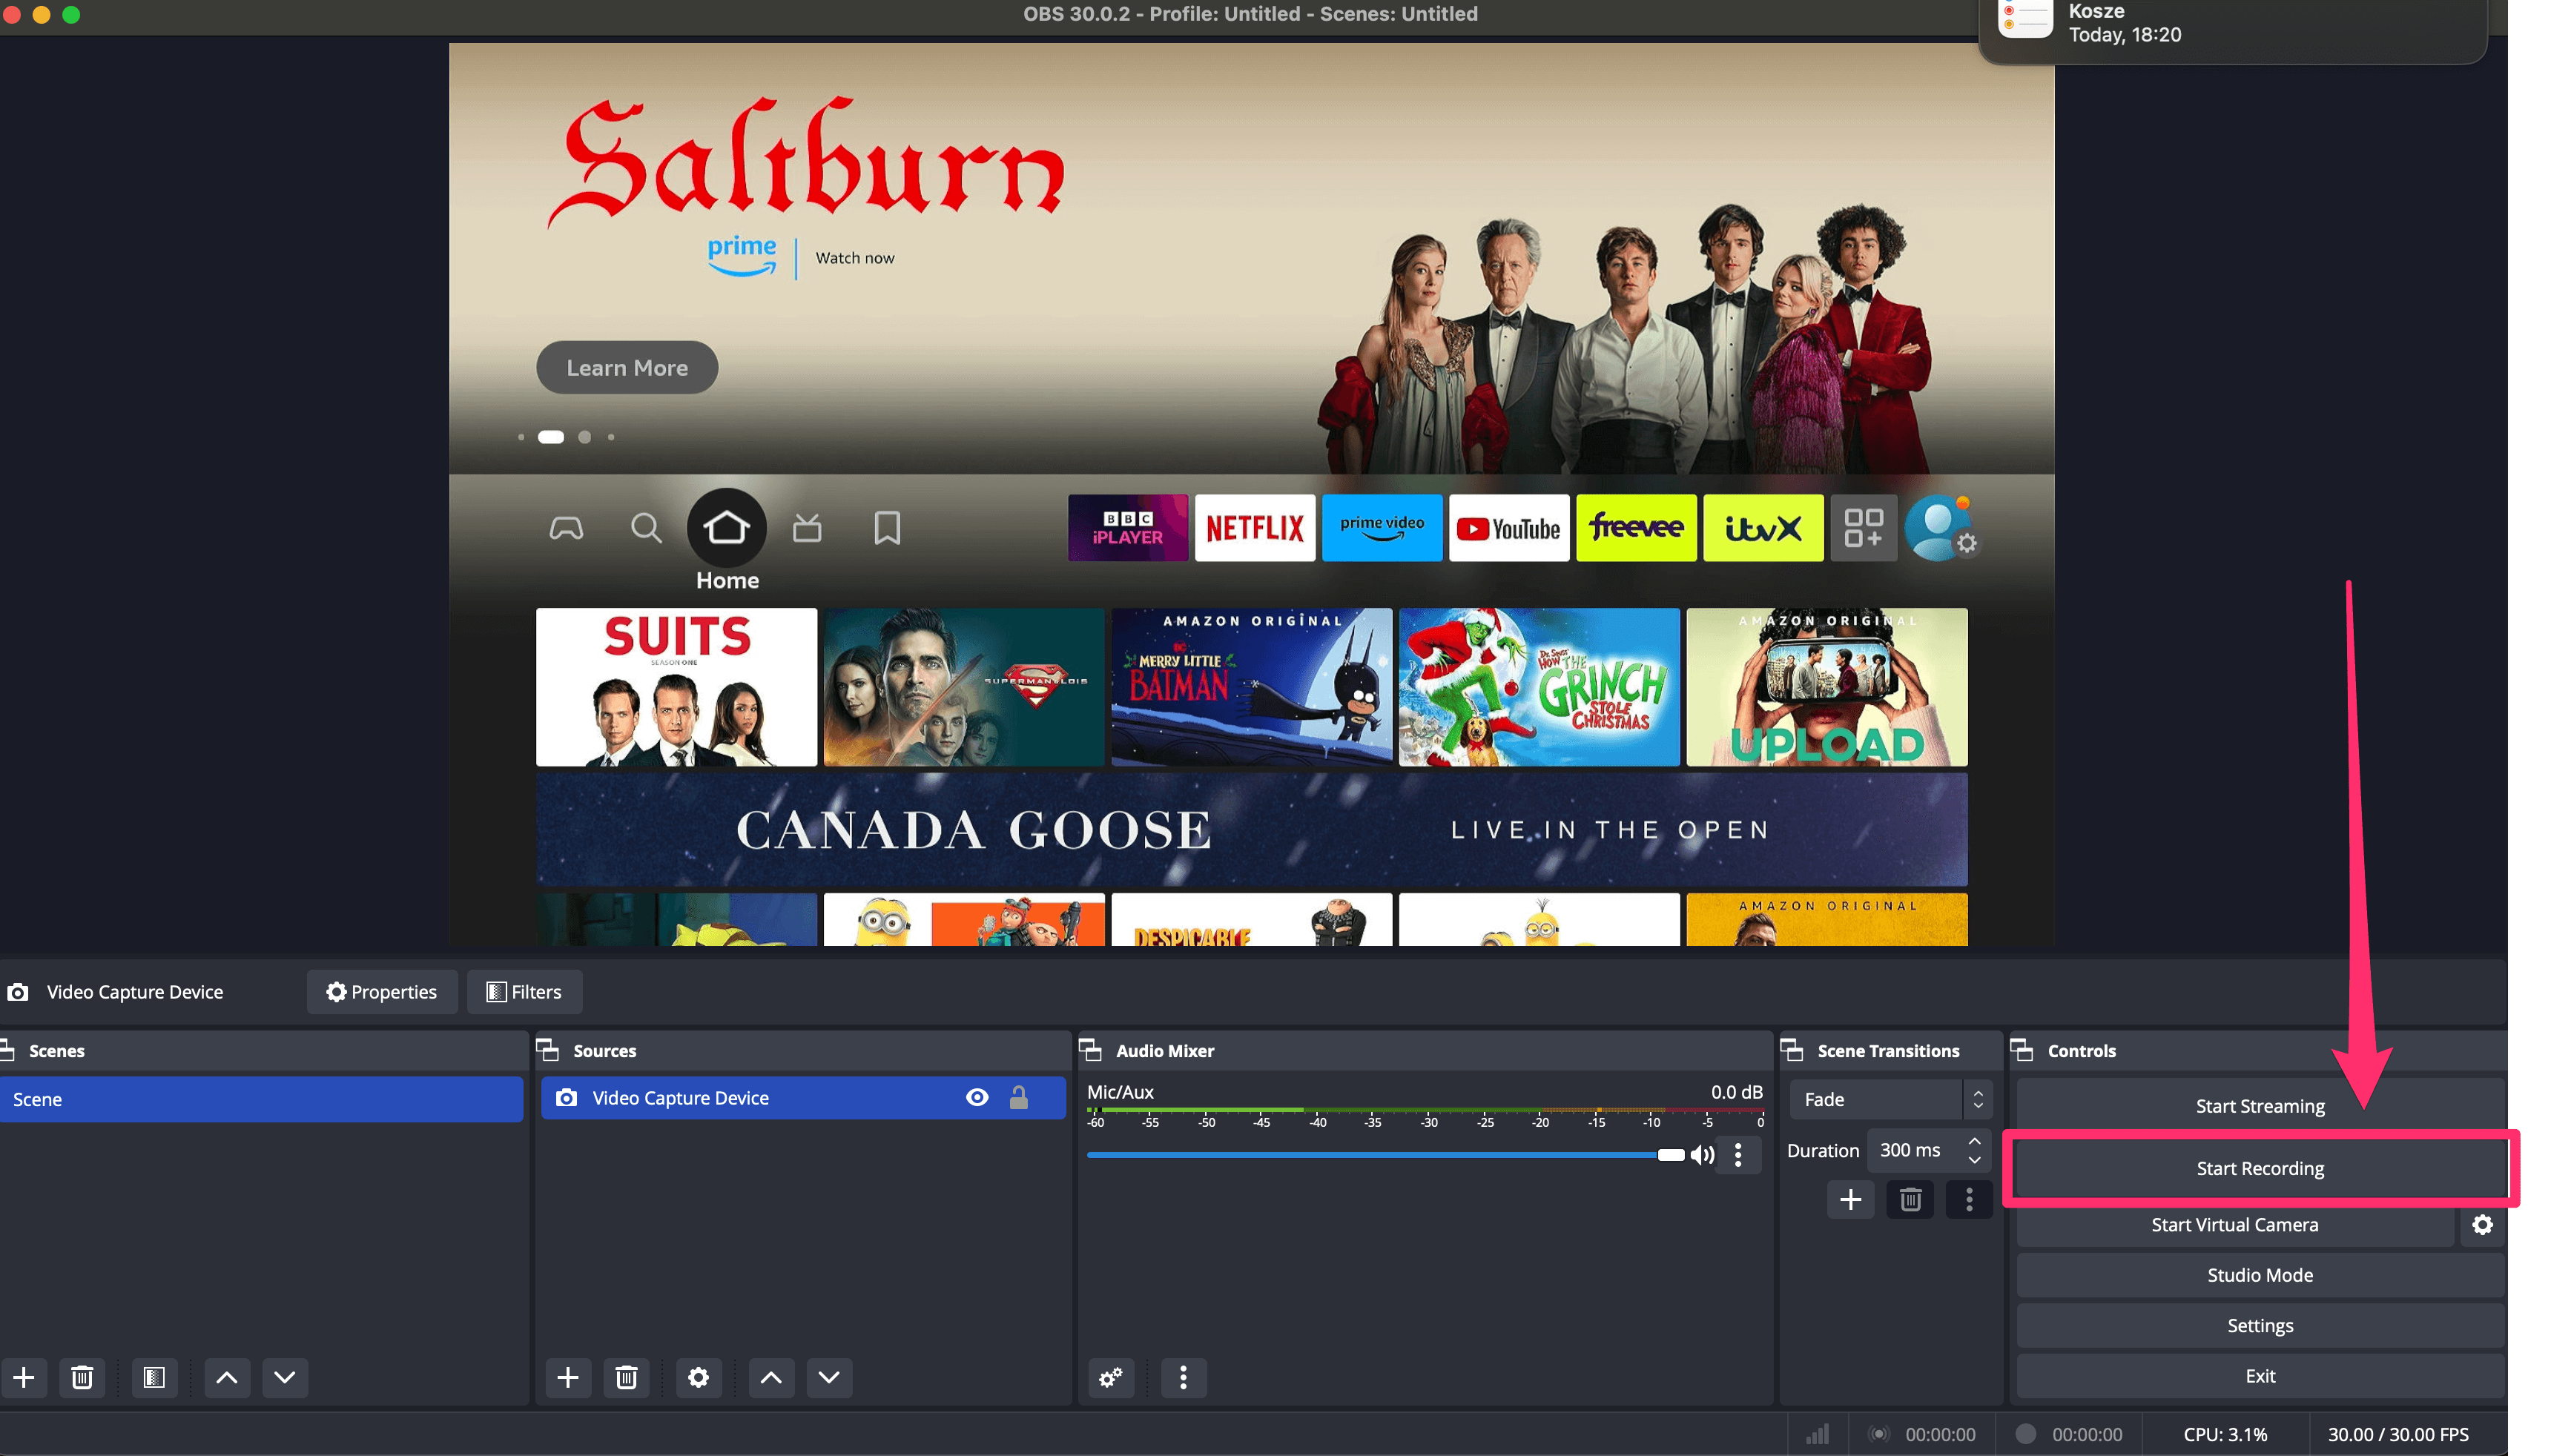
- Start Recording: With just a click on the ‘Start Recording’ button in OBS, you can capture anything from your favorite movies and TV shows to app interfaces on your Fire Stick. This functionality is particularly useful for creating tutorials or reviews.
- Customizing Recordings: OBS offers various options to customize your recording. You can add text overlays, including webcam footage of yourself (great for reaction videos or commentary), and even mix in additional audio sources.
- File Management: Recorded files are saved on your computer, allowing you to build a library of your favorite Fire Stick content. Make sure to manage your storage space, especially if you’re recording long sessions or high-resolution videos.
Watching on Your Computer
- Live Viewing: You can also use OBS to watch Fire Stick content directly on your computer screen. This is especially handy if your TV is in use or if you prefer the comfort of your computer setup.
- Fullscreen Experience: For an immersive viewing experience, switch OBS to fullscreen mode. This way, you can enjoy your Fire Stick content as if it were playing directly on your computer.
- Low Latency: OBS provides a near real-time viewing experience with minimal lag, making it ideal for watching live events or playing games from your Fire Stick.
Troubleshooting Common Issues
Audio Sync Problems
If you encounter audio sync issues where the sound doesn’t match the video:
- Check OBS Settings: Ensure that your OBS audio settings match your system’s default settings. Mismatches can often lead to sync issues.
- Adjust Buffering: In OBS, under ‘Advanced Audio Properties’, you can tweak the audio buffering settings. Sometimes, minor adjustments here can resolve sync problems.
- Update Drivers: Ensure that your computer’s audio drivers are up-to-date. Outdated drivers can cause various audio issues.
Capture Device Failure
If your capture device is not working correctly:
- Reconnect the Device: Unplug and then replug your capture device. This simple step can sometimes resolve recognition issues.
- Try a Different USB Port: Switch to a different USB port on your computer. Faulty ports can lead to device failure.
- Check for Updates: Make sure that your capture device’s firmware and your computer’s USB drivers are up-to-date.
Legal Disclaimer
Recording Copyrighted Content
When recording content from your Firestick, it’s crucial to be aware of copyright laws:
- Personal Use: Recording copyrighted content for personal use is generally acceptable. However, distributing or sharing this content can infringe on copyright laws.
- No Redistribution: Avoid redistributing recorded content, especially if it’s copyrighted. Sharing these files can lead to legal consequences.
- Respect Copyright Notices: Pay attention to any copyright notices on the content you wish to record. If the notice prohibits recording, it’s best to adhere to these guidelines.
Remember, this guide is for educational purposes, and I am not a legal expert. For specific legal advice regarding recording copyrighted content, consult a professional.
Closing Thoughts
This HDMI Video Capture Device is an affordable and efficient way to record your Fire Stick screen with fantastic picture quality. It’s a versatile tool not just for Fire Stick but also for other devices with HDMI output.